Your MacBook has some great built-in security and privacy features, but are you using them all? Online threats are growing, so it’s important to make sure your data stays safe and your personal information remains private.
Luckily, macOS offers simple settings that can protect your MacBook from hackers, malware, and even unwanted tracking. Whether it’s enabling encryption or adjusting app permissions, these small tweaks can have a big impact on your security and privacy.
In this post, we’ll show you 10 key settings you should be using to boost your MacBook’s privacy and security. If you’re serious about keeping your data safe and your online activity private, these tips will help you take control. Let’s get started.
Want to secure your MacBook and other Apple products? You can download a Mac VPN to encrypt your app and browser traffic, stopping outsiders from seeing or stealing your information. ExpressVPN offers powerful encryption to keep your private information safe, so your data stays protected whether you’re at home or using public Wi-Fi.
What are MacBook security and privacy settings?
Mac privacy and security settings are controls built into macOS that help protect your data and ensure your computer is secure. These settings allow you to manage what information your Mac shares with apps, websites, and services. They also help your Mac defend itself against malware, unauthorized access, and other unwanted intruders that might misuse your data.
How secure are MacBooks?
Macs are known for their strong security, but how exactly do they protect your privacy and data? Let’s look into Mac’s strongest security features and see how they help to keep you safe online.
Apple Private Relay
Apple Private Relay is one of Apple’s latest security features, available with an iCloud+ subscription. This feature encrypts your browsing activity and masks your IP address. Instead of revealing your exact location, Private Relay generalizes your IP, making it harder for websites or third parties to track your movements online.
Lockdown Mode
Lockdown Mode is an excellent feature for extra protection if your Mac is lost or stolen. It limits access to various apps and services, preventing hackers from exploiting your device. Features like Messages, Live Photos, and FaceTime are either disabled or restricted. It also requires you to manually approve any new device or accessory before it can connect to your Mac, further securing your data from unwanted access.
Limited third-party app support
Apple is highly selective about the apps it allows in its App Store, helping to ensure risky apps don’t reach your Mac. It uses a process called App Review to inspect all third-party apps before they’re available for download. This ensures that apps meet high-security standards and aren’t packed with malware or spyware.
XProtect malware protection
Macs come with built-in malware protection called XProtect. This feature scans both Apple and third-party apps for potential threats. XProtect works in the background to identify and block malicious software before it can harm your system. It’s regularly updated to recognize new malware, so your Mac stays protected against emerging threats.
FileVault
To keep your data secure, macOS includes FileVault, a disk encryption tool that protects your files using advanced XTS-AES 128-bit encryption. FileVault ensures that your data remains safe, even if your Mac falls into the wrong hands. When enabled, you’ll need to enter your login credentials or a recovery key after rebooting your system to access your files.
Gatekeeper
Even after an app passes Apple’s App Review, your Mac’s Gatekeeper feature performs another check before allowing the app to run. Gatekeeper verifies the app has been signed by a trusted developer and checks for any malicious code. If Gatekeeper detects anything suspicious, it can stop the app from running or prevent it from downloading in the first place, giving you an extra layer of security.
Why change Mac privacy and security settings?
While macOS has a variety of built-in protections, they still require some customization from you to keep your personal information secure. Adjusting your privacy and security settings can give you even more control over how your data is handled–and who has access to it.
Prevent tracking from websites and apps
One of the main reasons to adjust your settings is to stop websites and apps from tracking you on your Mac. Many apps and websites collect data about your location, browsing habits, and activity in the background. Mac lets you alter your location services and app permissions to limit how much of this information is shared. This helps to stop companies from building detailed profiles on your activity.
Protect against cyber threats with built-in features
Many apps also have access to your personal data. They often request access to your camera, microphone, and other apps, even when it’s not essential for their functionality. Regularly reviewing and changing your app permissions can limit this unnecessary data sharing. For example, if a simple note-taking app asks to access your camera, it might be worth reconsidering whether it’s needed before you simply select ‘Allow’.
Add extra security with FileVault encryption
Adjusting your privacy and security settings can also help protect you from growing cyber threats. MacOS has many built-in features like the firewall, Gatekeeper, and Lockdown Mode to help block unauthorized access and malware from running on your computer. Switching on FileVault can add another layer of security, encrypting your hard drive to keep your data safe from prying eyes if it’s lost or stolen.
8 Mac privacy and security settings to change now
So which privacy and security settings should you start with? Here are our top 8 recommendations to boost your privacy and keep your MacBook’s information secure:
- Disable location sharing
Location sharing on your Mac allows apps and websites to track your location. While useful for services like maps and weather, not all apps need this access. Some track your movements in the background, potentially selling the data to advertisers or leaving it vulnerable if the app isn’t secure.
Disabling location sharing enhances your privacy by limiting apps’ access to your real-time location. Instead, grant location access only when absolutely necessary. This keeps you in control of who sees your location and when.
To disable location sharing on MacBook, follow these steps:
- Click the Apple icon in the upper left corner and choose System Settings.
- Select Privacy & Security from the sidebar.

- Click on Location Services.
- Turn the toggle off to disable all location services. You may need to enter your login credentials.
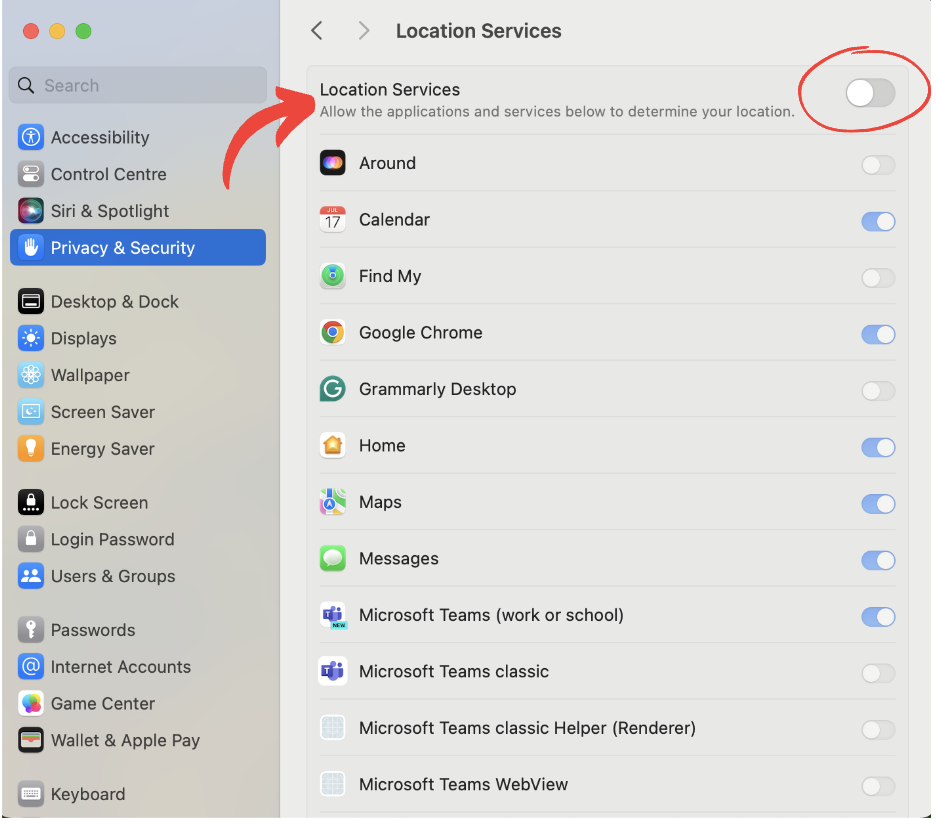
- You can also leave the toggle on and disable location tracking for individual apps if you prefer.
![]()
2. Review app permissions
Apps on your Mac may request access to your microphone, camera, or files, but not all need it. Regularly review these permissions, as some apps overreach and request unnecessary access, potentially tracking you across other sites.
Limiting permissions ensures only necessary apps can access sensitive features like your camera, microphone, contacts, and calendar. This helps protect your privacy and prevents apps from collecting more data than needed. You can always grant temporary access when necessary, keeping your Mac’s security under better control.
Follow our step-by-step guide to change app permissions on MacBook:
- Click the Apple icon in the upper left corner and choose System Settings.
- Select Privacy & Security from the sidebar.
- You’ll see the full list of Mac functions and apps, such as Photos, Camera, and Microphone.
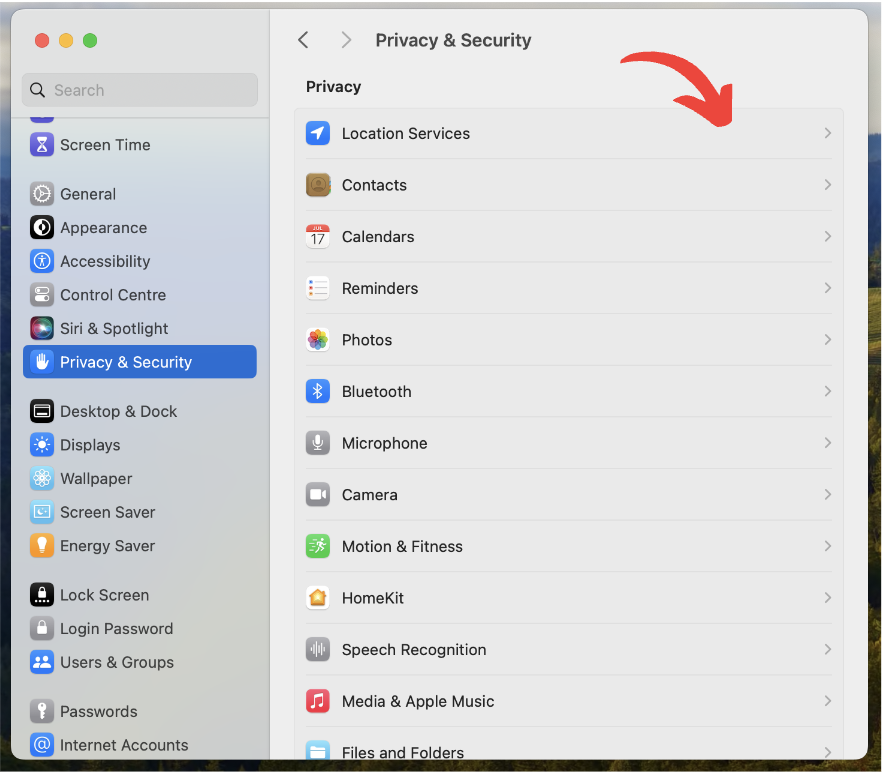
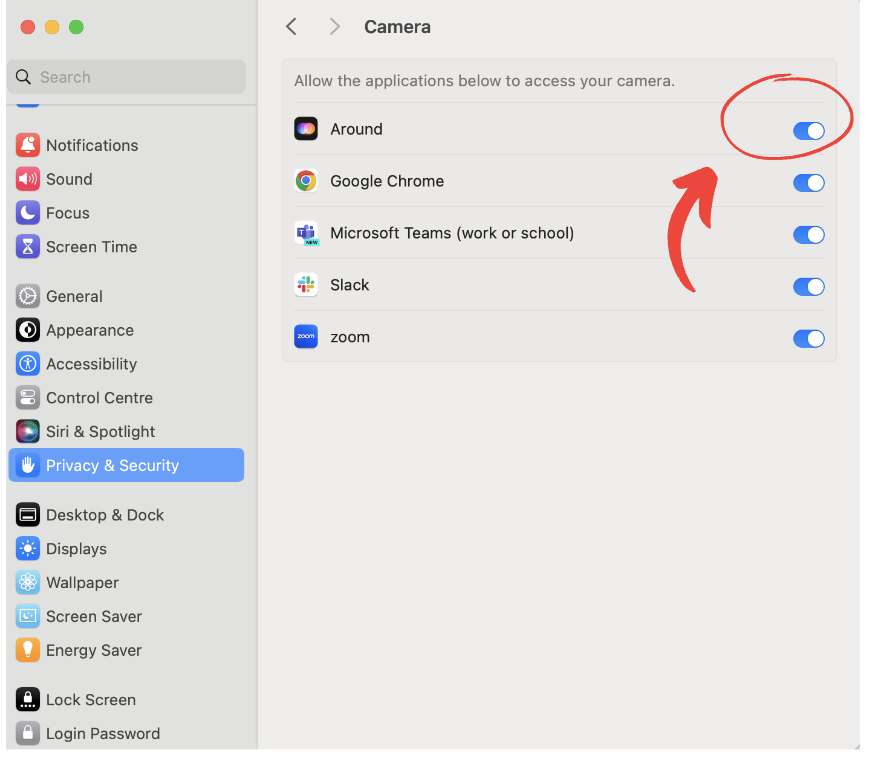
- Click through each setting to see which apps have access to functions. For example, click on Camera to see which apps use your camera.
- Disable the toggles for apps as necessary.
3. Protect data with FileVault encryption
One of the easiest ways to boost your Mac’s security is by enabling FileVault, a built-in feature that encrypts the data on your hard drive. If your MacBook is ever lost or stolen, FileVault ensures that your sensitive information stays protected. When enabled, it requires your login password or a recovery key to access your files.
- Click the Apple icon in the upper left corner and choose System Settings.
- Select Privacy & Security from the sidebar.
- Scroll down to FileVault and click on it.
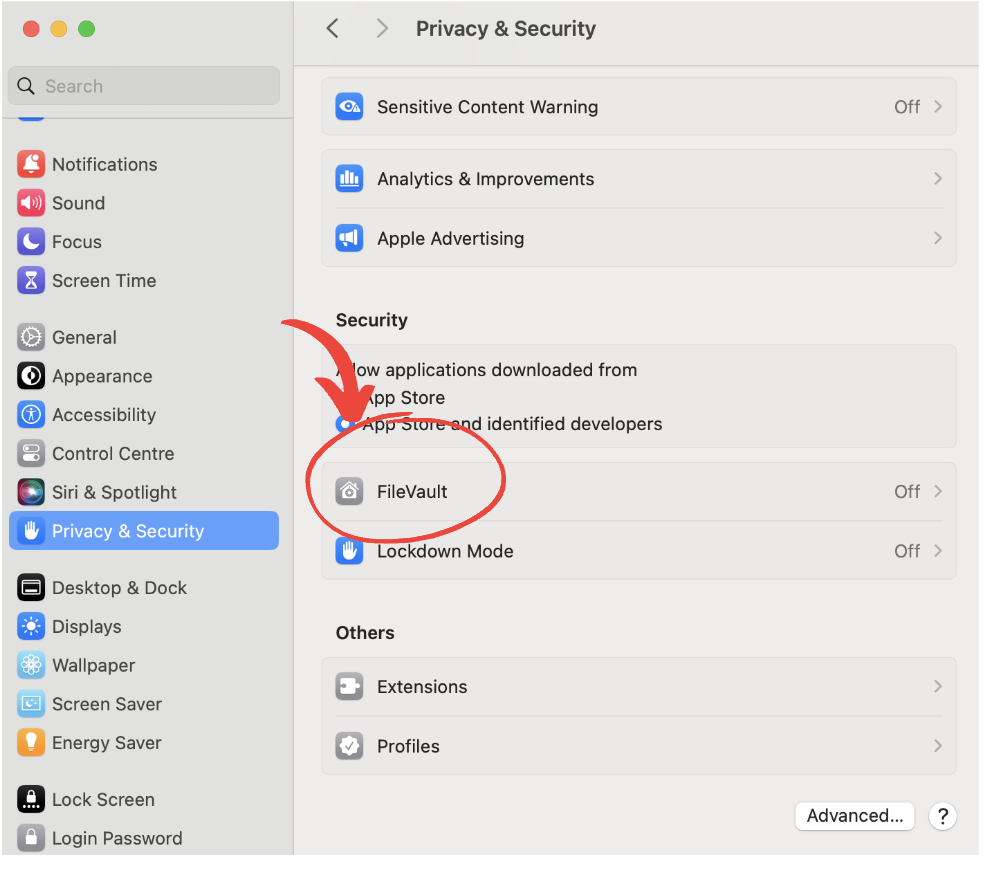
- Press Turn On… to activate the FileVault.

- You may see a popup asking you whether you’d like to use your iCloud account to unlock the disk. You can choose to use your email or a recovery key. Press Continue.
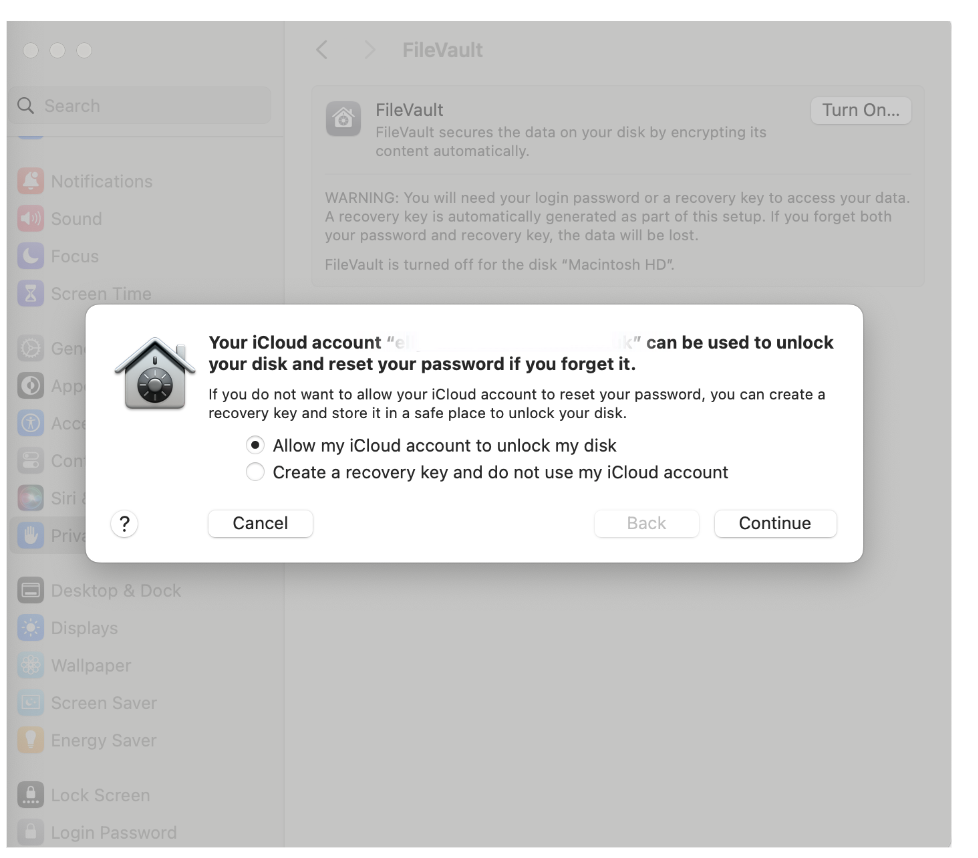
- Wait for your Mac to finish encrypting your files.
4. Turn on the firewall
Your Mac comes with a built-in firewall, designed to block unauthorized devices and networks from connecting to your computer. It monitors incoming traffic, ensuring that only trusted sources can interact with your Mac. It stops unwanted access while still allowing the apps and services you trust to run smoothly.
The firewall is especially useful when you’re connected to less secure networks, like public Wi-Fi, as it prevents malicious software from taking advantage of vulnerabilities. Here’s how to enable the firewall in macOS:
- Click the Apple icon in the upper left corner.
- Click Network in the sidebar.
- Click on Firewall.
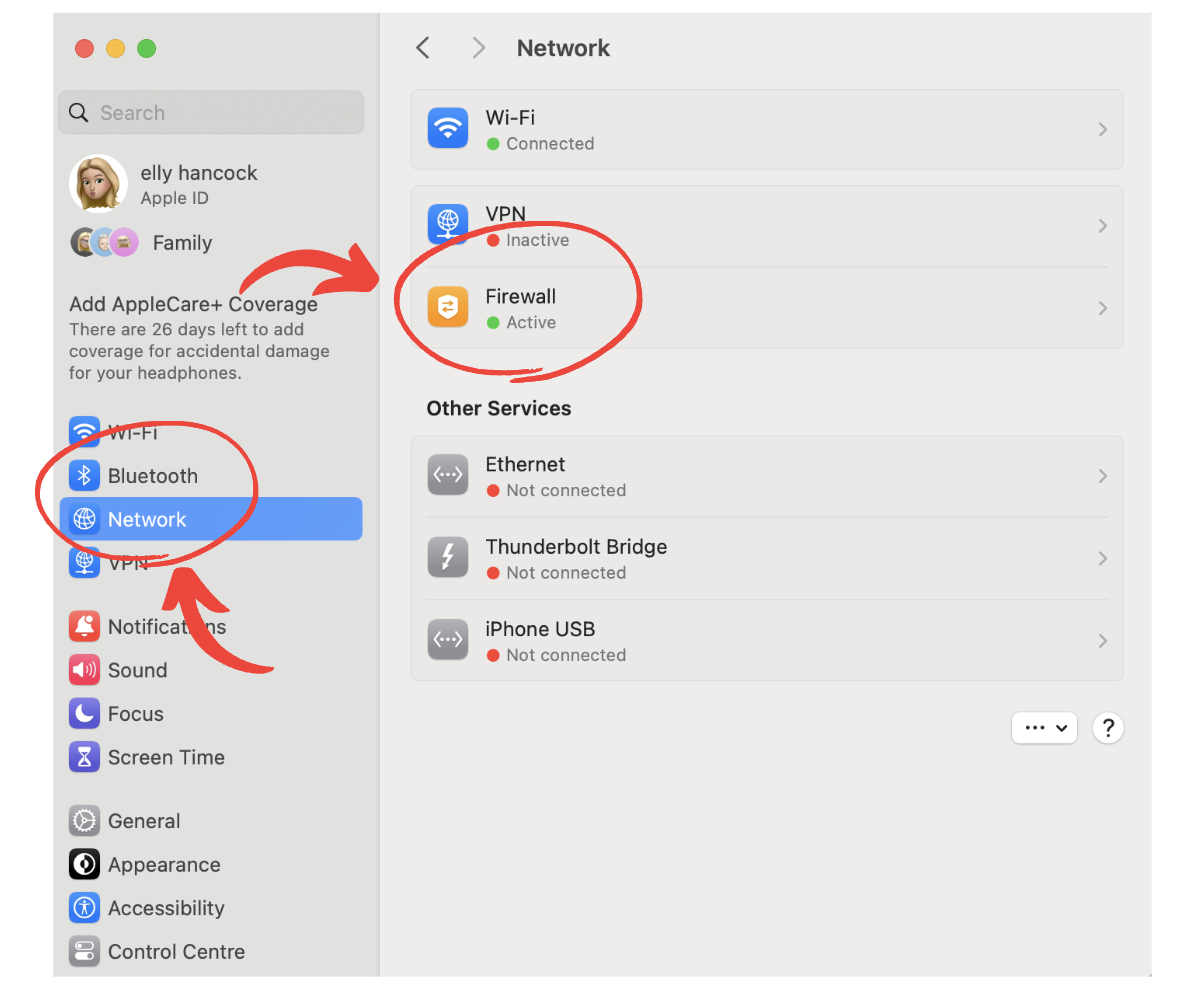
- Turn the toggle on to activate the firewall.

5. Turn off Siri
Siri is designed to listen for voice commands, which means it’s always actively listening for the “Hey Siri” prompt. Although your Mac processes most of this locally, some voice data is sent to Apple’s servers for improved accuracy and functionality. This data could include personal information or sensitive content from your requests.
Turning off Siri helps protect your privacy by ensuring your conversations and data stay fully on your Mac. This stops any voice data from being transmitted externally. If you don’t use Siri frequently, disabling it reduces the chances of unintentional data sharing and prevents any background listening.
Follow these steps to turn off Siri on macOS:
- Click the Apple icon in the upper left corner and choose System Settings.
- Scroll down and click on Siri & Spotlight in the sidebar.
- Press the toggle to turn off Siri.

6. Enable automatic updates
Keeping your Mac up to date is one of the easiest and most effective ways to protect your device from security threats. Apple regularly releases updates to patch vulnerabilities and fix bugs. Failing to update your Mac can open your system to malware and other vulnerabilities, as outdated software is often a target for cyberattacks.
Enabling automatic updates means your Mac stays protected without manually checking for updates. Here’s how to turn on automatic updates:
- Click the Apple icon in the upper left corner and choose System Settings.
- Click on General from the sidebar, then Software Update.
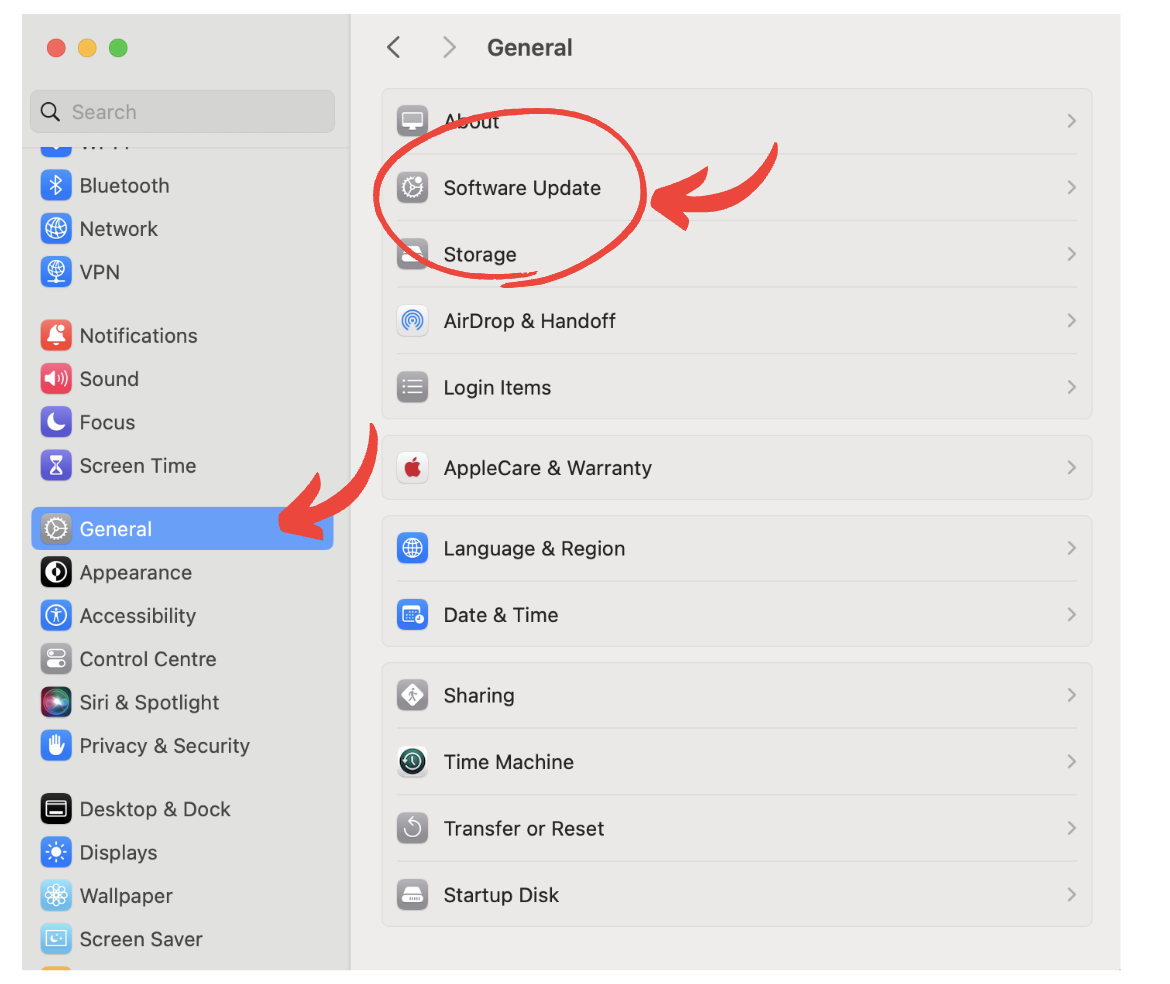
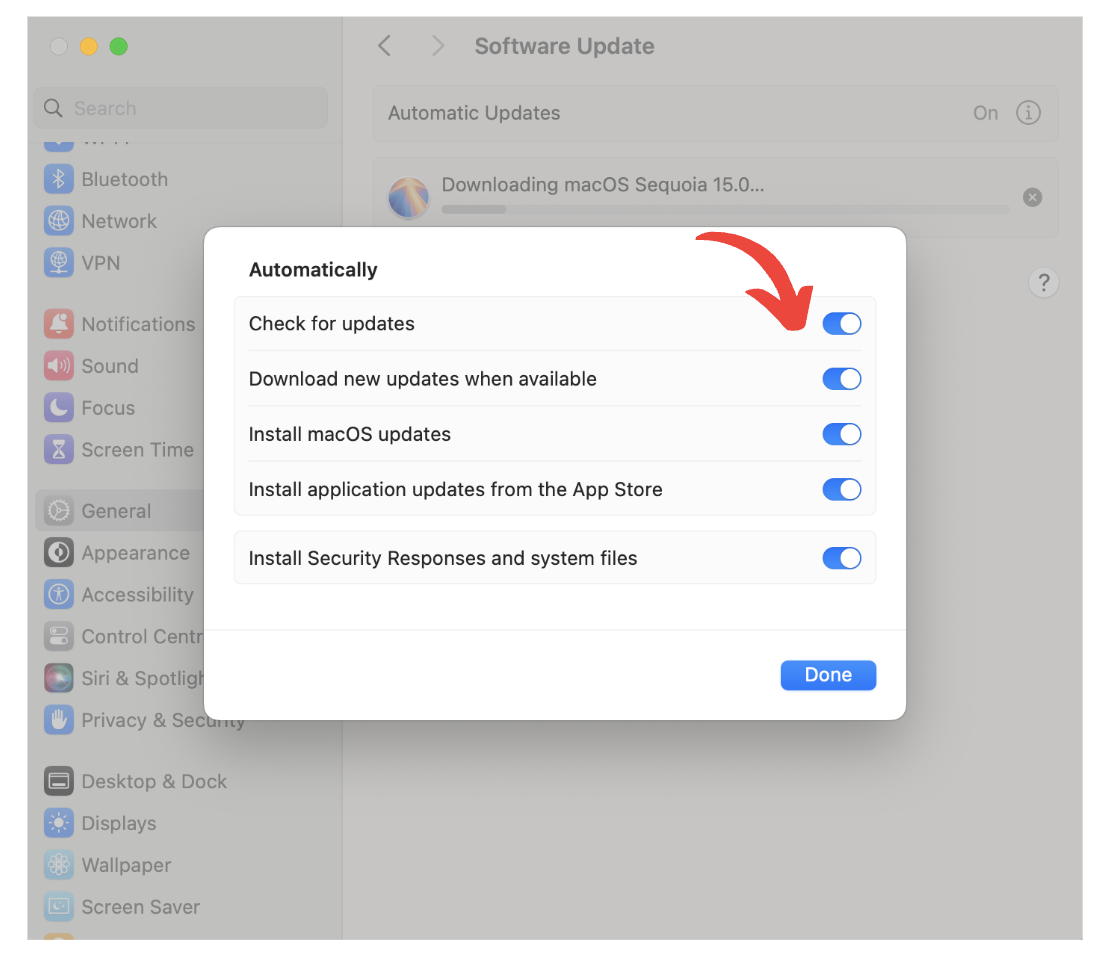
- Click on the information icon next to Automatic Updates.
- Your Mac will notify you if your system needs updating and attempt to run these updates automatically, so you don’t need to do anything.
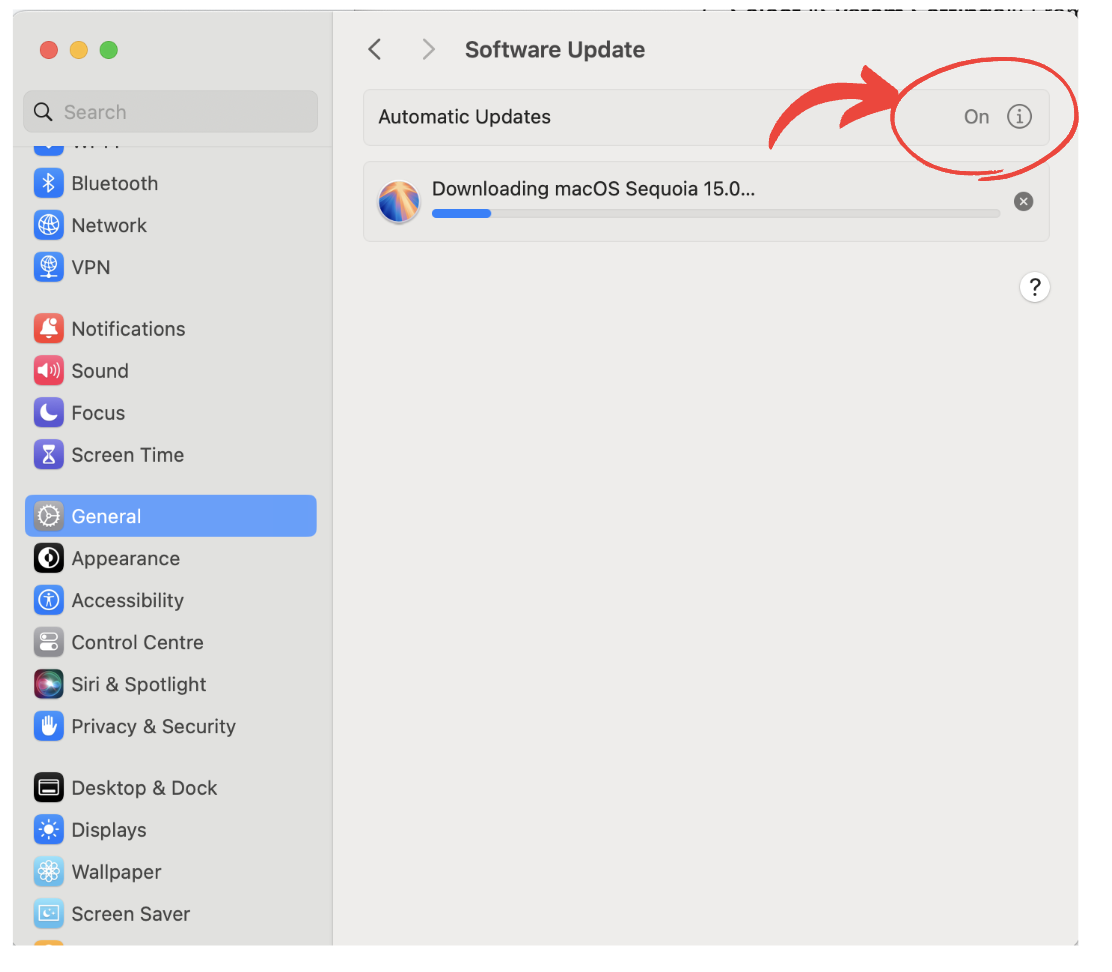
- You can customize your settings in the popup menu. For increased security, make sure all toggles are turned on.
7. Use a VPN
Using a Mac VPN is one of the best ways to secure your online activity. A VPN encrypts your internet connection, scrambling all data sent and received so it’s protected from anyone who might try to intercept it. This makes it much harder for hackers, snoopers, or even your internet service provider (ISP) to track what you’re doing online.
A high-quality VPN also masks your IP address, keeping your identity and location private. You can even choose an IP address from anywhere in the world, preventing websites and third-party advertisers from tracking your activity. This is especially valuable on public Wi-Fi, where your data is more vulnerable to cyber threats.
While Apple’s Private Relay on iCloud+ can mask your IP and encrypt Safari traffic, it’s not a true VPN. It only provides a localized IP and doesn’t protect traffic outside Safari, leaving some data exposed. A Mac VPN like ExpressVPN offers full-device encryption and the flexibility to choose from 105+ countries, securing all your traffic. You can also try ExpressVPN risk-free with a 30-day money-back guarantee.
Set up a VPN for Mac in 3 easy steps:
- Sign up for ExpressVPN and download the app for Mac.
- Log in to your account.
- Choose a server location and connect. That’s it!
Get ExpressVPN
8. Disable automatic Wi-Fi connections
Wi-Fi networks can pose a security risk, especially if it’s a public or unknown network. Public Wi-Fi, like those in cafes, airports, or hotels, is often unsecured and can leave your personal data vulnerable to hackers or other malicious activity. Cybercriminals can easily intercept your data on these networks, potentially accessing sensitive information like passwords, emails, or financial details.
By disabling automatic Wi-Fi connections, you can control when and where your Mac connects to the internet, avoiding risky or insecure networks. Follow these steps to get started:
- Click the Apple icon in the upper left corner and choose System Settings.
- Click on Wi-Fi in the sidebar.
- Find your preferred networks under Known Networks.
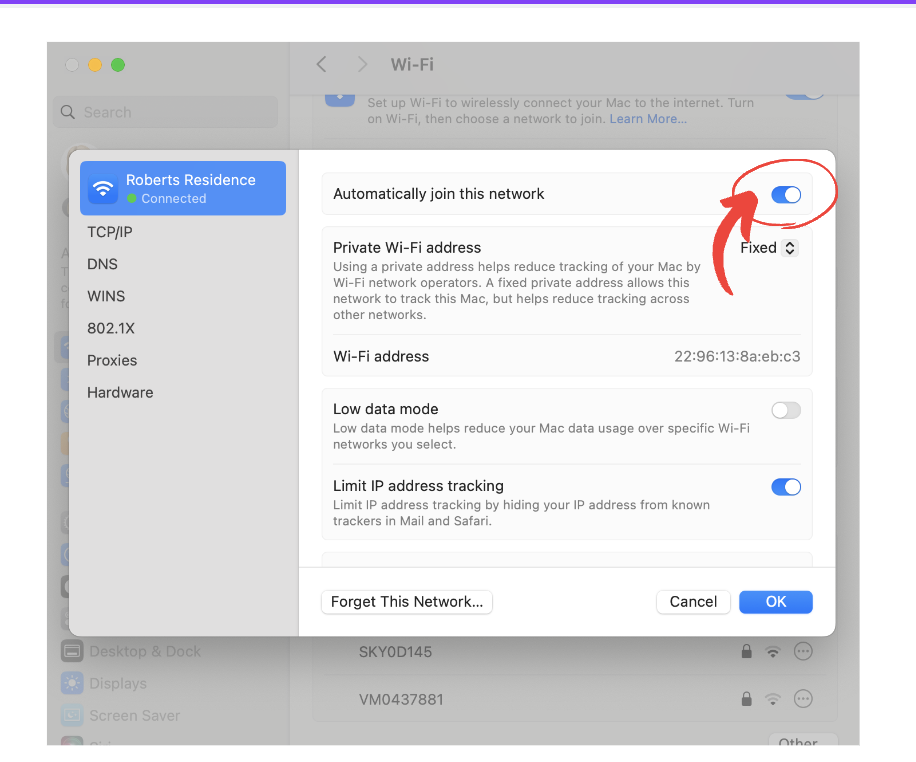
- Click the three dots next to a network to change the auto-connect settings.
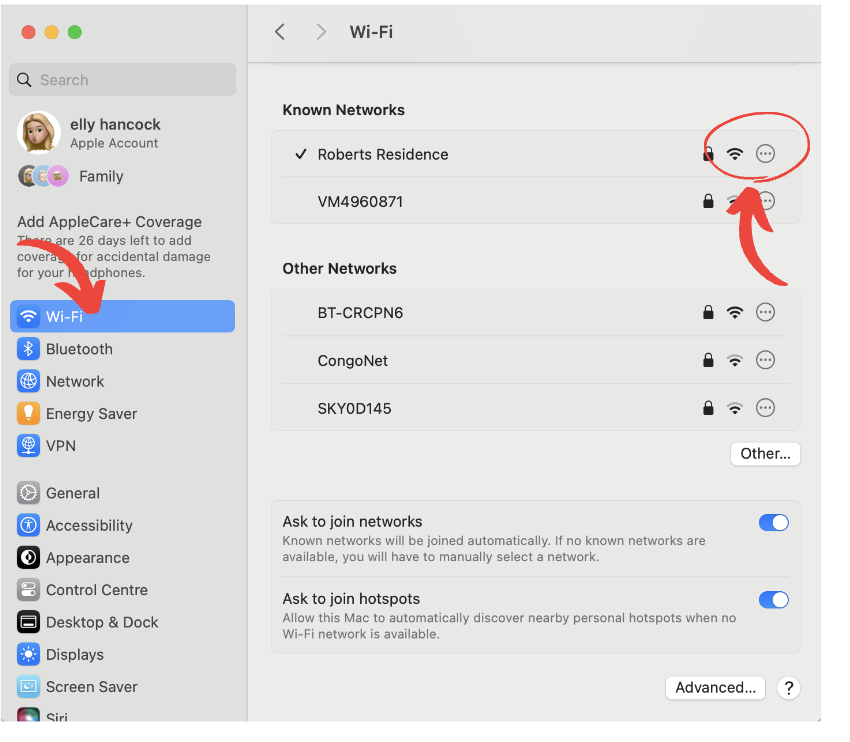
- Turn off the toggle if you want to stop automatically connecting to a certain network.
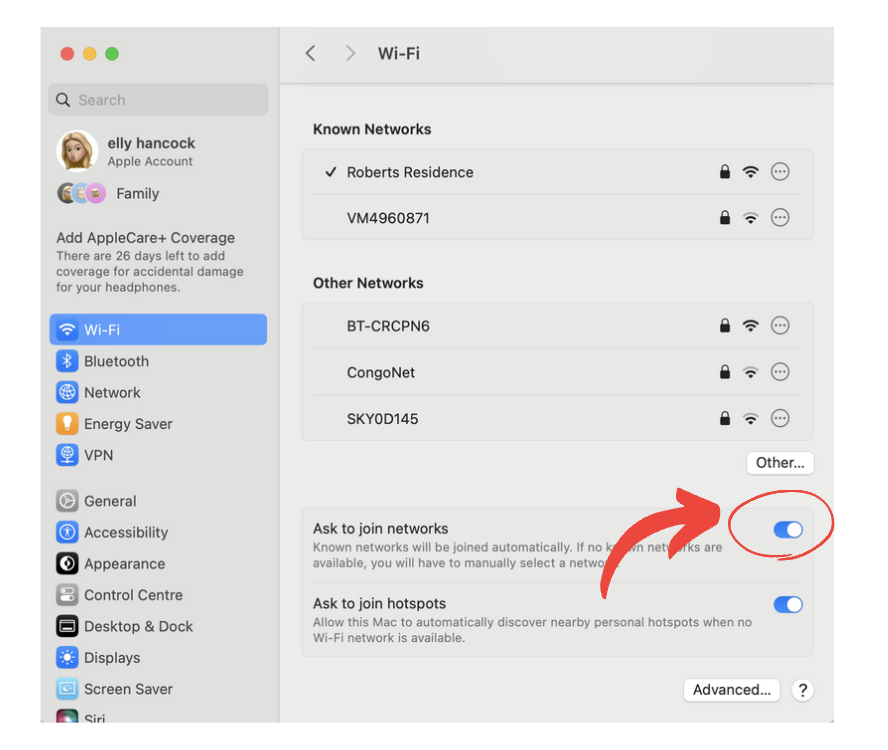
- Scroll down to the Ask to join networks settings and turn the toggle on. This ensures your Mac never gets to an unknown network without your consent first.
How else can I protect my Mac?
While macOS offers strong built-in protections, there are a few additional steps you can take to keep your data on your MacBook even more secure:
1. Use antivirus software
Though Gatekeeper helps block untrusted apps, it doesn’t cover all types of malware. Adding antivirus software gives you extra protection by scanning for viruses, ransomware, and other harmful programs that may slip through. This way, your system stays safe from a wider range of threats.
2. Enable two-factor authentication (2FA)
Turn on two-factor authentication for added security, especially on your Apple ID. With 2FA, you’ll need both your password and a verification code to log in. It’s an easy way to make sure only you have access to your accounts.
3. Set up regular backups
Backing up your data protects you from data loss. Using Time Machine, you can back up your files to an external drive regularly, so your information is safe even if your Mac runs into trouble.
4. Create a guest user account
If you occasionally share your Mac, setting up a guest account helps protect your personal files and settings. This account allows others to use the device without accessing your private information, keeping your data secure.
5. Use strong, unique passwords
Make sure you’re using strong, unique passwords for all your accounts. A password manager like ExpressVPN Keys can help you create and store secure passwords, so you don’t have to worry about remembering them all. With a password manager, your accounts stay safe and easy to access.
Get ExpressVPN
FAQ: About MacBook Security
Follow these steps to get to your Privacy and Security settings on your Mac:
- Click the Apple icon in the top left corner of your screen.
- Scroll down and select System Settings.
- From the left sidebar, click on Privacy & Security.
- You’ll see the privacy and security panel to alter your settings as needed.
To turn on content and privacy restrictions on your Mac, follow these steps:
- Open System Settings from the Apple menu.
- Select Screen Time.
- Click Content & Privacy in the sidebar.
- Toggle Content & Privacy Restrictions to turn it on.
- From here, you can manage various restrictions, such as limiting app usage, blocking inappropriate content, and controlling privacy settings.
If the security and privacy settings are greyed out on your Mac, it’s likely because the settings are locked. To make changes, follow these steps:
- Open System Settings and click Privacy & Security.
- Click the lock icon at the bottom-left corner of the window.
- Enter your administrator password or use Touch ID to unlock the settings.
Once unlocked, you should be able to make changes to your security and privacy preferences.
To get full permissions on your Mac, you need to ensure you have administrator access. Here’s how:
- Open System Settings.
- Click on Privacy & Security.
- Scroll down to Full Disk Access and select it.
- If the settings are locked, click the lock icon in the bottom-left corner and enter your password.
- From here, you can grant full access to apps by checking the box next to the app you want to allow.
You can’t change certain settings if you’re using a guest or non-administrator account, so you’ll need to log in as an admin.
To change security permissions on your Mac:
- Open System Settings and select Privacy & Security.
- Scroll down to the Privacy section, where you can manage permissions for features like Location, Microphone, Camera, and more.
- To adjust permissions, click on each category (e.g., Camera, Microphone) and check or uncheck the apps that should have access.
If needed, click the lock icon in the bottom-left corner and enter your password to unlock and make changes.



 English (US) ·