If you've invested in a Breville coffee maker, you've chosen one of the best coffee makers on the market. But even high-end machines need some TLC from time to time to keep brewing great coffee. Just like knowing how to clean a coffee grinder is essential for fresh-tasting brews, descaling your Breville is key to maintaining your daily cup's quality.
Don't worry if you're new to this — it's simpler than it sounds. In fact, once you get the hang of it, you'll find it's not much more involved than learning how to clean a Ninja coffee maker. Regular descaling removes mineral buildup, keeps your machine running smoothly, and ensures your coffee always tastes its best.
Whether you're dealing with the popular Barista Express, the compact Bambino Plus, the versatile Precision Brewer, or the convenient One Touch, each model has its own specific descaling needs. Ready to give your Breville some love? Let's walk through the descale process step by step, so you can keep enjoying that perfect cup of coffee at home.
How to descale the Barista Express

(Image: © Tom's Guide)
When the CLEAN/DESCALE light illuminates on your Breville Barista Express, it's time to begin the descaling process. Dissolve one Breville descaling powder sachet into one litre of water, then fill the water tank with this solution. Make sure to remove the water filter before beginning this process.
To enter descale mode, press and hold the 2-CUP button and then press and hold the POWER button simultaneously. The machine will begin heating, indicated by the flashing POWER button. You'll know the machine is ready when the POWER button, 1-CUP button, CLEAN/DESCALE indicator and HOT WATER/STEAM indicator are all illuminated solid.
Press the 1-CUP button to begin descaling the coffee component. Next, descale the steam component by turning the steam dial right toward the steam icon. Then descale the hot water component by turning the dial left toward the hot water icon. You can terminate the steam and hot water descaling by turning the dial back to STANDBY.
After completing these steps, approximately half (0.5 litre) of the descale solution should remain in the water tank. Repeat the above processes to complete the descaling and empty the solution. Once finished, remove the water tank and rinse it thoroughly.
Fill with fresh cold water to the maximum capacity and repeat all steps again to cleanse the machine of any remaining descaling solution. Finally, press POWER to exit the descaling process, indicated by the LED lights switching off.
For more detailed information about your specific model, you can refer to your machine's manual here.
How to descale the Bambino Plus
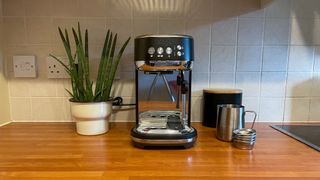
Your Breville Bambino Plus will indicate it needs descaling when the 1 CUP and STEAM button and the 2 CUP button flash alternately for 15 seconds. Begin by emptying the drip tray and placing it back into position on the machine. Fill the water tank to the DESCALE line and add the descaling agent to the water.
Position a large 2L/68 fl.oz container under both the portafilter and steam wand. Turn the machine off by pressing the 1 CUP and STEAM buttons simultaneously, and allow it to cool completely before beginning the descaling process. Once cooled, press and hold the 1 CUP and STEAM buttons simultaneously for 5 seconds to enter descale mode.
When the 1 CUP and STEAM buttons illuminate, the machine is ready to begin descaling. Press either the 1 CUP or STEAM button to start the cycle — these buttons will flash alternately throughout the process. Once the descale solution has been used up, the mode will pause. Refill the water tank to the MAX line and empty the waste water container, then replace both parts.
The 1 CUP and STEAM buttons will illuminate when ready. Press either button to resume descaling. When the process is complete, the 1 CUP and STEAM buttons will alternately flash and the machine will enter standby mode. Finally, remove and empty the waste water container, and thoroughly rinse and dry the drip tray and water tank before replacing them.
For more detailed information about your specific model, you can refer to your machine's manual here.
How to descale the Precision Brewer
(Image: © Future)
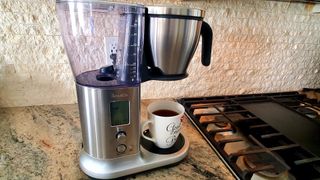
When a descaling cycle for your Breville Precision Brewer is needed, your machine will display "DESCALE" (flashing) on the LCD. Empty the tank and prepare a descaling solution according to the manufacturer's instructions. Pour this solution into the empty water tank.
Position the basket and carafe in place under the drip stop outlet, making sure the carafe is empty and its lid is securely locked. Press and hold the SELECT button for 3 seconds to start the descaling cycle. The LCD will show "dSL" for 1 second and then display the remaining time of the cycle. The entire process takes approximately 15 minutes to complete.
Once the descaling process finishes, the LCD screen will return to the main menu. Fill the tank with fresh water and run two complete brewing cycles to thoroughly flush the system. Make sure to discard the water from the carafe and rinse it thoroughly between cycles. It's recommended to perform these additional brewing cycles after descaling to flush out any remaining descaling solution.
For more detailed information about your specific model, refer to your machine's manual here.
How to descale the One-Touch Coffee House
(Image: © Future)
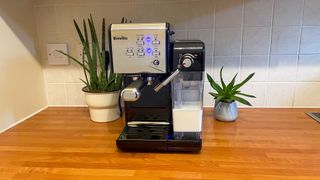
Your Breville One-Touch Coffee House needs descaling when you notice increased brewing time, excessive steaming, or white deposits building up on the brew head surface. For those using filtered water, descale every 80 brew cycles; if you're using tap water, descale every 40 brew cycles.
Begin with the water reservoir: fill it with undiluted white household vinegar and let it sit overnight. The next day, remove the reservoir and discard the vinegar. Rinse the tank thoroughly with tap water, filling it halfway and discarding the water twice to ensure it's clean.
For the internal parts, make sure the machine is off and unplugged, then fill the reservoir with vinegar. Insert the porta-filter (with filter but no coffee) and place a large empty cup under it on the drip tray. Then plug in the machine and switch it on. Once both the Espresso heater and Steam heater lights become solid, press the Automatic Espresso button twice. The vinegar will flow through and stop automatically.
For the milk system, place a large cup (minimum 325 mL/11 fl. oz. capacity) under the frothed milk dispensing tube. Fill the milk reservoir with water and place it back on the unit. Turn the Froth Control Knob counterclockwise to the clean position, then press the Clean button. Let the cycle run until either no milk comes out of the tube or the cycle stops automatically.
Finally, repeat all steps using only tap water to remove any remaining vinegar from the machine.
For more detailed information about your specific model, refer to your machine's manual here.
Now that you've learned how to clean your coffee grinder, you should be ready to elevate your coffee game. Discover how to make espresso like a barista, find the best coffee maker, or learn how to make iced coffee in 4 simple steps.








 English (US) ·