I’ve always thought about making a physical photo book, but the idea of organizing my digital photos, of which I’ve got thousands tucked inside the Photos app, puts me off every time. That was until photo book service Bob Books invited me to try out its service. What made this particular offer appealing is the company has its own designer software that you can download on Mac, Windows, and Linux. No cloud-based crashes and a much easier way to bring my memories out of my phone. This software is the company’s most popular creation method, although they’ve also got a redesigned app coming out in December.
Yes, the idea of making a photo book still felt incredibly overwhelming. But, once I followed the software and its outstretched helping hand, I found it a lot easier.
Whether or not you've tried one of the best photo book services yet, there were seven clear things I learned along the way. If you’re considering making one for a gift or have a special occasion you want to display — here’s what you’ll need to know.
1. Choose a theme, or work from scratch
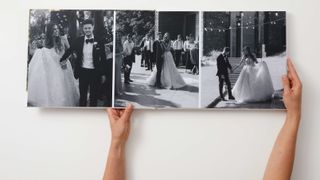
Before even opening the Bob Designer software on my desktop, I realized the book needed a purpose. Whether it was to show off great landscapes, capture pictures of my kids, or immortalize a special occasion. I chose to use photos of my wedding day, which I’d never printed off physical copies of and knew I probably never would.
Once I knew what theme my book would have, it felt a lot easier to jump into the next step. Picking a theme, or knowing you want to make a collage of images, is the best place to start.
2. Sort your photos first
As I opened the software, I realized that themes were also something Bob Books had thought of. There’s numerous ready-made templates to choose from and I could pick a design and features that matched what I was after. These included; rustic, true love, our year, diary, our family, and even a maritime theme. You can also opt, if you want, to cover the full surface of the pages.
What I knew I had to do before I went any further was sort all my photos into one folder on my computer ready to load in. A lot of my photos live on my phone, so I scrolled through and favourited the ones I wanted. If they’re on your computer, copy them straight into a separate folder. Then, Bob Designer allows you to load them all in, scroll through them, and drop them in as desired.
3. Take your time
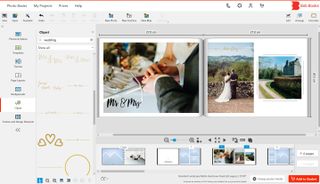
It can feel incredibly overwhelming when there’s a blank canvas and a lot of precious memories to display. Plus, you’re paying for it, so you want it to be something you’re proud of by the end of it.
The thing about Bob Designer is that as long as you sign up and log in, you can save as you go. That meant if I was feeling overwhelmed, I could step away and come back at another point. I did this a few times before I was happy with my photo book, and I’d recommend it to anyone trying to build their own.
4. Make decisions as you go
There’s plenty of decisions to make about the style and look of your photo book, but you don’t need to make them all at once. In my case, it started with the format — and there were eight to choose from. Luckily, there was a little bit of detail about each format and what they suited, so I opted for the Standard Portrait listed as “an elegant, traditional format, perfect for many memories.”
Then, you can choose between classic, gloss-coated, or matte paper. Plus, a choice between traditional or flat-lay binding. Finally, a hardcover or a softcover. What I loved about Bob Books’ format was that it showed images demonstrating exactly what you’d be getting. I didn’t need to understand what a flat-lay binding was, I could see it for myself.
Even if you change your mind, there’s a "change product details" button that means you can add pages and change various options after the fact. You’re not locked in until you buy it and it's something I'd suggest everyone takes into account when deciding which service to use.
5. Choose a mode that suits you

Then, you choose the mode. There’s the Photo Book Assistant that automatically arranges everything on your pages, or Design it Yourself that gives you freedom to place and rearrange the photos from scratch.
I opted for the Photo Book Assistant, considering I already felt overwhelmed. But, I quickly realized the Assistant wasn’t as intuitive as I would’ve liked with the placement of the photos — centring the wrong focus in family photos and cutting off what I felt to be important parts. So, I switched to designing it myself. Then, the options were endless. There was also a tutorial explaining what I should be doing, which I’m always thankful for when trying out something new.
6. Take advantage of design elements
There’s a host of frames, design elements, clipart, and backgrounds you can add to your photobook in Bob Designer. They’re incredibly diverse and by default, there’s a fair few to choose from. But, you can download more, and there’s literally thousands.
For my first photo book, I wanted to keep the wedding theme simplistic, even though there’s a lot on offer for weddings. While I added some gold detailing, I didn’t realize it was going to add on anything to the price of the photo book, so I’d be aware of that in future. I’d also be bolder and braver next time around. Hence, why I learned to take advantage of decorations and detailing more.
7. Order ahead of time
Finally, something I didn’t consider was how long delivery would take. Since they’re printing a whole photo book for you, I wasn’t entirely surprised to hear it would take 1-2 weeks to turn up. Even paying extra for a speedier delivery wasn’t going to take away from the fact printing would take the same amount of time. But, it turned up earlier than I thought.
What I’d definitely do in future is make sure I order it ahead of time, especially if it’s for a gift or special occasion. There’s nothing worse than spending all this time building the perfect photo book to not get it in time for whatever you’re ordering it for.
Final thoughts

I’m not sure what I thought it would cost to make a photo book, but with only 26 pages on a hardcover, at default it was £33. Then, add on delivery and the extra details, it was just over £50.
What I do know is that I wouldn’t have bothered making one in the first place if it wasn’t for the software they offered. It made the whole process easier and the product I’ve received is sleek, clean, and exactly what I was after. What it means to me is worth a lot more.
I’m proud to share it and it feels so much more personal than handing over my phone for someone to scroll through. It’s only been in my house a short time and my daughter has already flicked through it like a storybook. What I’ve learnt is that I didn’t realize how important and nostalgic it felt having this occasion in physical form. After feeling overwhelmed, the software helped lay it out to me in a way that made it palatable and easy to understand. This was my first photo book, but it won’t be my last.
More from Tom's Guide
- Best photo editing software
- The best digital photo frames
- The best photo storage and sharing sites








 English (US) ·