Despite testing countless writing tools over the years, the new proofreading feature in Apple Intelligence feels genuinely useful in iOS 18.1. This isn't just another spell-check — it's an AI-powered writing assistant that works across your device, and crucially, keeps your text private. For those wondering how to activate Apple Intelligence, you'll find it seamlessly integrated into your familiar typing experience.
Beyond text, Apple Intelligence opens up new possibilities across iOS — you can use Clean Up, Apple's take on the Magic Eraser, and there's even an updated version of Siri that you can type to. The proofreading feature in Writing Tools feel less like add-ons and more like natural extensions of iOS, working directly on your device to catch errors, suggest improvements, and help you write with confidence.
Whether you're drafting sensitive emails or trying to craft the perfect sentiment, these features work right where you need them, without sending your text to the cloud. Let's dive into how Apple Intelligence can assist you with proofreading.
1. Open Notes

(Image: © Future)
Launch the Notes app from your iPhone's home screen or App Library.
2. Create or select your note

(Image: © Future)
Either tap the compose button to create a new note, or select an existing note that contains text you want to check.
3. Add or review your text

(Image: © Future)
Type the content you want to proofread into your note, or make sure your existing text is ready for review.
4. Select text for proofreading

(Image: © Future)
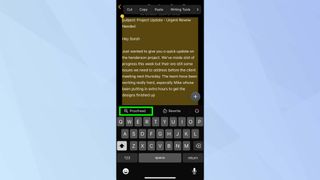
Touch and hold the text, tap Select then drag the selection handles to highlight the content you want Apple Intelligence to check. If you want the entire note proofread, tap Select All.
5. Access the proofreading tool

(Image: © Future)
Tap the proofreading icon that appears in the menu below your selected text.
6. Wait for AI analysis

(Image: © Future)
Let Apple Intelligence analyze your text. Once it's finished processing, you'll be able to see how many changes its made, as well as being able to flit between the original and the AI version. You can really see the difference.
7. Review AI suggestions

(Image: © Future)
Look through the suggested improvements that appear, including grammar, spelling, and style recommendations. If you want to retrieve the first draft, click Original and it will show your note without the AI corrections. Happy proofreading!
Now that you've activated Apple Intelligence across your devices, you can start exploring its features. If you're looking to tame your inbox, learn how Apple Intelligence can summarize all your emails. For help with documents and messages, Writing Tools is one of Apple Intelligence's most useful features — here's what it can do. And for less well-known features, check out iOS 18 Notes just got a major overhaul — here's how to use it.


 English (US) ·