Apple is expected to announce a brand new, completely redesigned Mac mini M4 early next week. However, last Friday, I finally decided to pick up a Mac mini for myself after eying up Cupertino’s smallest Mac for what seems like ages.
It’s not everyday I outright buy a new computer, though I do get a chance to try out a lot of different machines as part of my job testing and reviewing the best mini PCs. The problem is that there’s one very iconic mini PC I just haven’t had a chance to try yet and come next week, the Mac mini M2 will likely be completely overshadowed by this new model.
Just like with the best iPhones, you definitely don’t want to pick up a new Mac days ahead of the release of its successor, especially since Apple products tend to remain at or around their launch price for years. However, when I found out that this was the year that Apple would finally give the Mac mini’s design a major revamp while ditching its USB-A ports, I figured what did I have to lose.
To that end, I ordered the base model of the Mac mini M2 as I also wanted to put the company’s claims about 8GB of RAM being enough for most people to the test. I did consider upgrading to 16GB of RAM but that configuration needs to be ordered directly from Apple with a longer wait time if you don’t want to end up overpaying a third-party seller online. Fortunately, we might soon be able to put this debate to rest once and for all as the base models of its M4 Macs will reportedly ship with 16GB of RAM as the new standard. I guess we’ll find out next week.
As for me, I just spent a week with the base Mac Mini M2 after not having used macOS for almost 20 years. Here’s why it’s still a great mini PC even if it’s about to be replaced by something even smaller and much more powerful thanks to the addition of Apple’s M4 chip.
A timeless design
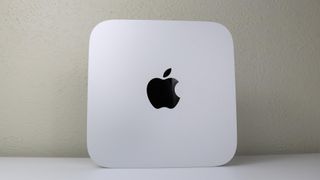
While the Mac mini got its iconic aluminum unibody redesign back in 2010, the original version was first introduced by Steve Jobs all the way back in 2005. At that time, Jobs described it as “very, very tiny” and the “mini” in its name actually comes from the iPod mini.
Before the Mac mini, Apple sold desktops, all-in-one computers and laptops but not a device that was “BYODKM” or bring your own display, keyboard and mouse. The reasoning behind this new Mac not shipping with a mouse and keyboard was that people likely already had their own accessories and being able to use them on their new computer made it a lot easier to switch from Windows to Mac.
The Mac mini has changed quite a lot over the years too. The original had a white polycarbonate plastic top, aluminum sides and a disc drive. The top eventually became aluminum as well and the disc drive became unnecessary as the years went by too.
In the coming days, we’ll likely see an even smaller Mac mini as it’s rumored to sport similar dimensions to the current Apple TV. It could also be a bit taller though, which would make it look a lot more like a scaled down version of the Mac Studio. The resemblance will be even more striking if Apple adds extra ports to the Mac mini M4’s front panel like some recent reports have suggested it will.
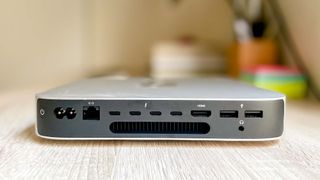
Besides the upgrade to an M4 chip and a smaller footprint overall, the other big change we’re likely to see with the Mac mini M4 is with its ports. Yes, we’re potentially getting more of them but at a steep cost — at least in my opinion. While the standard Mac mini M2 has two Thunderbolt ports and two USB-A ports, the Mac mini M2 Pro (pictured above) has four Thunderbolt ports.
With the Mac mini M4, Apple is apparently going to get rid of the device’s USB-A ports altogether and go with five Thunderbolt ports instead. Don’t get me wrong, I love USB-C as it’s a huge improvement over Micro USB but I’ve always had a soft spot for USB-A. Going from USB-A to USB-C is great for things like connecting external displays or charging, but the same can’t be said when it comes to accessories.
If you switch between computers as often as I do, unpairing and then repairing Bluetooth devices gets to be quite annoying. This is why I often use 2.4 Ghz USB dongles with the best mechanical keyboards and my trusty trackball mouse when possible. That way, I just unplug the dongle on one machine and then plug it into another and I’m ready to go.
This switch from USB-A to all USB-C ports is one of the reasons I picked up a Mac mini M2, even though I’ve been eagerly awaiting the release of the Mac mini M4. However, since the design of the Mac mini has remained unchanged for more than a decade, there are a lot of great accessories for it and this was the other reason I wanted to try out this particular Mac.
For the love of ports (and storage)
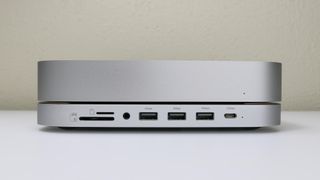
In order to make the Mac mini work for me, I was going to need some more ports as well as a microSD card reader. Fortunately, there are several docks and hubs that do just this. However, none of them look quite as clean and mesh with the Mac mini as well as the Satechi Mac Mini Hub.
It slides right under your Mac mini — or even your Mac Studio — to give you extra ports on the front of your computer. In total, you get a USB-C port, three USB-A ports, a microSD and SD card reader and a headphone jack that’s easier to reach. There are also two versions: one with a slot for an M.2 SSD on the bottom and a slightly cheaper one that you can’t add extra storage too.
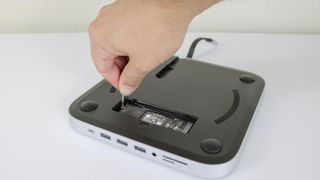
Satechi sent over the former for me to test out after I did a story on adding their aluminum USB headphone stand to my desk setup. Before going through the setup process on my new Mac mini M2, I flipped over the USB hub and used the included tiny screwdriver to add a 1TB M.2 SSD to the bottom. This took only a minute or so to do but now, I wouldn’t be limited by the 256GB SSD on my base model Mac mini nor would I need to invest in more iCloud storage.
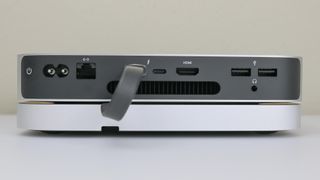
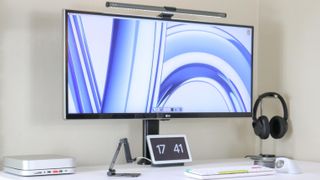
The best part, you get all these extra ports and card readers and you only have to give up one Thunderbolt port on the back. This worked out perfectly for me as I planned on using the Mac mini’s HDMI port to connect to an ultrawide monitor and the other Thunderbolt port with a portable monitor for a quick and easy dual-monitor setup. Also, the non-pro Mac mini M2 only supports two external displays anyways.
Not quite a seamless switch
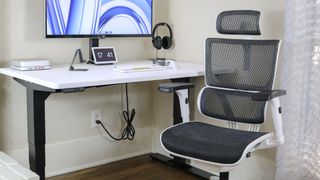
Instead of swapping out the Acemagic F2A mini PC that’s currently set up at my main desk, I decided to build a new desk setup from the ground up just for the Mac mini M2. This way I’d always be able to run back to the comfort of my office if the Spinning Wait Cursor — also known as the Spinning Beach Ball of Death (SBBOD) — did me in. And this was a very real possibility given the sheer amount of Chrome tabs I have open at a time while working.
For this particular desk setup, I used one of the best standing desks from Uppeal. I figured the company’s 2 Leg Desk ($1,129, Uppeal) would help me channel my inner Steve Jobs as it’s one of the only desks you can use while sitting on the floor which he was known for doing in Apple’s early days. I paired this desk with one of the best office chairs in case floor sitting wasn’t for me though and I thought the black and white design of X-Chair’s XS-Vision chair ($599, X-Chair) was a perfect fit for this setup.
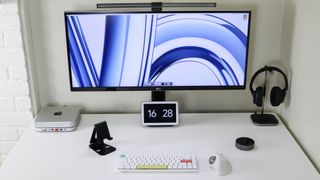
I initially thought going back to macOS after almost two decades of using Windows exclusively would be difficult but surprisingly, it was a lot like getting back on a bike for the first time in ages. That iconic Mac startup sound hit me with a wave of nostalgia and it reminded me of turning on my Power Mac G4 for the first time back in 2001.
Once the initial setup process was complete, I reacquainted myself with macOS. From the Menu Bar at the top to the Dock at the bottom of my screen, I was reminded of all things I used to love about my big old Mac desktop. After I started dragging apps into the operating system’s Applications folder and I mounted my recently installed 1TB SSD on the Mac mini’s desktop, I was ready to start using Apple’s smallest Mac for work.
I started off pretty easy by checking my email, jumping on a few video calls with the rest of the Tom’s Guide team and doing some research on upcoming stories. Just like with my Windows PCs though, I wanted to use this computer the way I liked which is why I downloaded and installed Chrome instead of switching to Safari. Fortunately, Google added a
Memory Savermode to its browser a few years back but even with it turned on, I knew I was getting close to the threshold of my Mac mini’s available RAM. To be sure, I pulled up the Activity Monitor app every now and then and as I thought, I was using 7 out of 8GB of RAM.
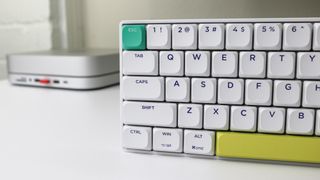
The switch from using my favorite Windows keyboard shortcuts to their Mac equivalents threw me through a bit of a loop too. I knew this would be difficult though, so I used my favorite mechanical keyboard for traveling as it has both operating system’s key names on the bottom row. I do have a NuPhy Air60 on hand too but in the rush to build a desk, assemble a chair and get everything set up, I didn’t want to be bothered with switching keycaps. I might do that later on though as the Ukvey C68 keyboard ($40, Amazon) pales in comparison to one of NuPhy’s low-profile keyboards.
Another thing that threw me off at first was not having native window snapping like in Windows or even ChromeOS. To that end, I downloaded and set up Rectangle before remembering that Apple had in fact added window snapping with the release of macOS Sequoia just last month.
Still a worthwhile endeavor
So did I make a mistake by buying a Mac mini M2 just days ahead of the Mac mini M4’s launch? Kind of. Buyer’s remorse could set in big time next week but given my penchant for USB-A ports, I still think the older design of the Mac mini M2 is the right choice for me. Granted though, I definitely should have gone with the M2 Pro version for the extra RAM and larger storage.
I still have a few days left to make my final decision but part of me really just wants to return the base model Mac mini M2 and splurge a bit on the Mac mini M2 Pro. Overall, I really do prefer smaller mini PCs but I can’t justify a thinner and lighter device at the cost of a very standard port that’s been going strong for 28 years now. Then again, I’m sure Satechi and other Mac accessory makers are already working on similar hubs for the Mac mini M4.
We’ll see, maybe Apple can convince me that the Mac mini M4 really is the better choice after all. For that though, I’d need to see an actual presentation instead of learning about the new iPad mini like I did in a press release earlier this week. Fingers crossed we get an epic MacBook Air-style reveal for the Mac mini M4 after a “one more thing” from Tim Cook.
Either way, I’m glad I took the time to give macOS another shot after all these years and one way or another, I plan on living a multi-OS life going forward to get the best from both Windows and Mac.
More from Tom's Guide
- I mounted a mini PC to the back of my monitor for an even cleaner setup
- The 5 things I'm glad I knew before buying a mini PC
- I just tried a pocketable mini PC that transforms from a workstation into a gaming rig







 English (US) ·