There’s no upgrade quite like a new Wi-Fi router, especially when it’s packing the latest wireless tech. However, when you combine that with even faster internet, your home network becomes almost unrecognizable.
That’s exactly what happened to me when I decided it was time to test out one of the best Wi-Fi 7 routers for myself. I’ve been writing about Wi-Fi 7 for the past few years but since devices that support it are still few and far between, I had originally planned to hold off on upgrading.
Back when I started at Tom’s Guide, one of the first things I did was upgrade from a traditional Wi-Fi router to one of the best mesh Wi-Fi systems and for good reason. Not only was my router struggling to keep up with all of my connected devices but I also had Wi-Fi dead zones throughout my house. Switching to a mesh router solved both of these problems but it also gave me a chance to experience the higher speeds you get with Wi-Fi 6E thanks to its new, faster 6 GHz band.
For the past two years, my trusty TP-Link Deco XE75 has served me quite well but with Wi-Fi 7’s new features like Multi-Link Operation (which lets you use multiple bands simultaneously) and the promise of lower latency, I knew sooner or later that curiosity would get the best of me. I just didn’t think that one upgrade would lead to another.
Here’s how my experience upgrading to Wi-Fi 7 went and why doing so was the final push I needed to ditch cable internet for fiber.
An upgrade I had to experience for myself
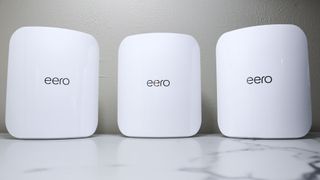
Although I’ve mainly been using a mesh Wi-Fi system from TP-Link, I have tried a few other mesh routers since my initial upgrade including the Wyze Mesh Router Pro and the eero 6+. For this reason, I was right at home when eero offered to send out one of their eero Max 7 mesh kits for me to test out.
While eero’s previous mesh routers were very compact and puck-shaped, the Amazon-owned company had to change up the design of the Max 7 to accommodate for the 10 internal antennas and the extra cooling needed for its more powerful components. At 8.4 x 7.1 x 3.4 inches, the Max 7 is a lot larger than previous eero devices but still smaller than the Netgear Orbi RBE973. In fact, Netgear also redesigned its mesh routers for Wi-Fi 7 while TP-Link stuck with its same cylindrical design.
Even though the eero Max 7 is on the larger side, its oval shape makes these mesh routers easy to hide around your home. After all, unlike with one of the best Wi-Fi routers, a mesh Wi-Fi system is made up of multiple devices (the main router and usually one or two satellites) that work together to create a mesh network to give you better coverage and range.
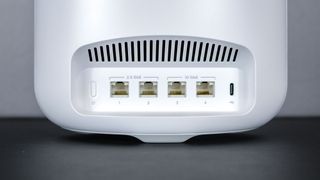
One thing that I really like about the Max 7’s new design is that there’s room for multiple Ethernet ports at the back. Eero’s previous mesh routers like the eero Pro 6e only had two Ethernet ports. Another big change is that the Max 7 is fully equipped for multi-gig internet with two 2.5 gigabit ports as well as two 10 gigabit ports. Just like with previous eeros though, it still uses a USB-C port for power.
I won’t bore you with all the details but getting the eero Max 7 up and running was incredibly simple. The eero app walks you through the whole process from adding a strong password to your home network to where you should position your eero devices for the best signal. With other mesh routers, you often need to scan a QR code or press a sync button to add a new satellite to your mesh network. With eero, you just plug in your satellites after setting up your main router and the app instantly detects them. It also lets you know if they’re positioned close enough but not too far from your main router.
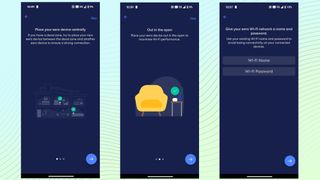
The whole setup process took less than 10 minutes and my Wi-Fi 7-powered mesh network was up and running in no time at all. To make things easier for myself and all of the smart home devices, mini PCs and other connected gadgets around my home, I used the same network ID and password with the Max 7 that I was previously using with my Deco XE75.
If you haven’t upgraded your router before, this is one of the best networking tricks there is as your devices will automatically reconnect despite the fact that they’re technically on a new network. It didn’t happen all at once but all of my devices eventually came back online and connected to the Max 7, saving me the hassle of having to manually enter passwords for each of them.
From one upgrade to another

I initially had the Max 7 connected to one of the best cable modems. However, one of the reasons you might want to avoid cable internet is because multi-gig plans are much more expensive. Likewise, you might not even be able to get one depending on where you live.
For instance, I’m an Xfinity subscriber (or at least I was) with the company’s Gigabit Extra plan that maxes out a 1.2 gigabits per second (Gbps). Before I upgraded to Wi-Fi 7, I called the company to see if they offered faster plans as one of the big draws of the Max 7 is its faster speeds. Unfortunately, Xfinity doesn’t offer its faster Gigabit Extra x2 plan in my area which has a top speed of 2 Gbps.
With a premium mesh Wi-Fi system like the Max 7, you want to ensure that you have right the internet speeds to truly take advantage of all that extra power. Xfinity didn’t, so I took a chance and called up my local fiber provider instead.
As it turns out, Houston-based Ezee Fiber not only has faster speeds but its plans are also a lot cheaper. Since I test VPN services for Tom’s Guide and often download multiple games at once when reviewing the best mini PCs, I previously paid Xfinity an additional $25 per month for unlimited data. With my new internet service provider, I’m now paying $20 less each month for 8 gigabit fiber internet ($140 vs $120) with no data caps whatsoever.
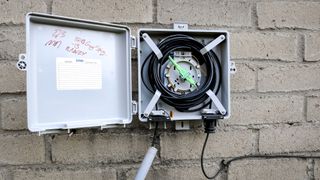
After a quick call, one of their technicians came the next day to install a box on the side of my house where the fiber optic cable comes in from the street. In order to get my new internet up and running quickly, the technician ran a temporary line from the main one with plans to come back later and bury it in my backyard.
Unlike with cable internet where the line comes into your house at a fixed point, my fiber install was more flexible and I was able to tell the technician exactly where I wanted the box. As we spend most of our time in the game room, I chose to have my new fiber connection come in there.
The following day, another technician came and did the interior install. Basically, this consisted of putting another smaller box on the interior wall for the fiber line as it entered my home.
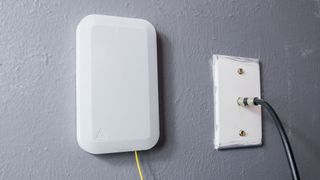
As you can see in the picture above, I still have my cable internet connected, though I am going to cancel soon. A great thing about upgrading to fiber from cable internet is that you can actually have both connections coming into your house at the same time. This gives you the opportunity to try fiber internet before you fully commit but you could also have two separate home networks in what’s known as dual WAN setup.
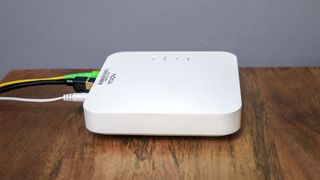
The yellow cable from the wall is then plugged into another box known as an Optical Network Terminal (ONT). It converts the light signals from your fiber internet into electrical signals and has an Ethernet port to connect to your router. Essentially, it works like a cable modem but for fiber internet.
If you decide to switch from cable internet to fiber like I did, you don’t necessarily need an ONT if your router has the right ports. For instance, the TP-Link Deco BE85 has an SFP+ port on the back and with that mesh router, I could have just plugged the yellow fiber cable directly into it. The ONT Ezee Fiber sent over is small enough though and I tucked it away out of sight, with my main eero Max 7 on a shelf next to it.
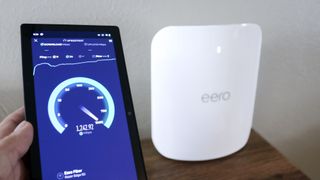
When I had my new fiber internet connection and the eero Max 7 set up, I immediately noticed a difference when it came to my download speeds as well as latency. All that extra bandwidth meant that my devices didn’t have to fight for their share. Even when running multiple speed tests simultaneously (which I don't recommend for an accurate reading), each device easily had download speeds over a gigabit. However, I wasn’t done there as eero has a brand new Wi-Fi 7-powered device I wanted to add to my home network as the finishing touch.
Bringing Wi-Fi 7 to the great outdoors
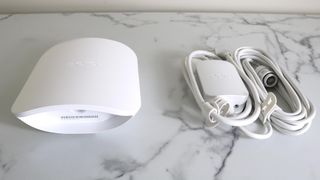
With a mesh router, you’re able to access the internet in places where you might not have been able to before. Poor connectivity in my garage was one of the reasons I switched but I also found that I was able to get online out in the backyard too, albeit with much slower speeds.
Depending on the size of your property, that might not be the case which is why eero recently launched the eero Outdoor 7. At first glance, it looks like another Max 7 satellite but it’s actually a weatherproof, outdoor mesh extender. This way, you can bring your mesh network and Wi-Fi 7 outside.
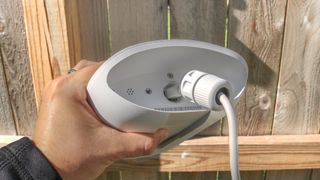
Getting the Outdoor 7 set up and running was as easy as adding another eero device to my mesh network. Once I had it mounted on a fence in my backyard and plugged in, I just went through the same simple setup process in the eero app.
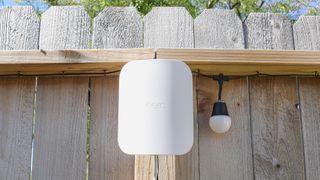
The Outdoor 7 has been hanging out there for two weeks now and it hasn’t disconnected or had any other issues.
I haven’t been able to make the most of it yet as the weather has finally gotten cold but come summer, I’ll be out there with my projector streaming movies without any annoying loading screens. And who knows, I might even take a few video calls for work outside.
So far though, I have a few of the best outdoor security cameras currently connected to it as well as the Ring Mailbox Sensor that lets me know when the mail arrives.
Bottlenecks be gone
I initially thought that I’d see multi-gig speeds on all of my devices with the eero Max 7 hooked up to an 8 gig fiber connection. Instead though, both upgrades eliminated the bottlenecks I used to experience with my cable internet and now, pretty much every device in my house is able to get a gigabit down without any issues.
The exception being my Wi-Fi 7-equipped mini PCs and when connected to the eero Max 7, I managed to hit 2 Gbps on both the Acemagic F2A and the Atomman G7 Ti.
To really make the most out of my new fiber internet, I’d need to connect directly to the Max 7 using a cable rather than Wi-Fi. The device on the other end would also need a multi-gig Ethernet port but these are becoming more common. Loads of mini PCs now have 2.5 gigabit ports but if you want a 10 gigabit port instead, you can add one to the Mac mini M4 for an extra $100.
Upgrading to Wi-Fi 7 can be expensive if you go with a more powerful mesh kit with all of the bells and whistles but it doesn’t have to be. There are already cheaper mesh kits with Wi-Fi 7 like the Linksys Velop Pro 6 or the TP-Link Deco BE63 but more are on the way.
I was really excited to upgrade to Wi-Fi 7 but if I hadn’t ditched my cable internet for fiber, I probably would have been slightly let down. If you’re thinking of upgrading yourself, just make sure that you have the right internet plan to make the most out of Wi-Fi 7.
More from Tom's Guide
- The Echo Dot now works as an eero mesh extender — just how good is it?
- Wi-Fi 7 routers: 3 things to consider before you upgrade
- Don't toss out your old mesh router — here’s how you can give it new life












 English (US) ·